Starting a press-on nail business offers an incredible avenue for creativity and entrepreneurship, transforming a passion into a profitable venture. However, the initial investment in nail products can seem daunting, especially with the vast array of options available. The accompanying video expertly details 10 essential products required to kickstart your press-on nail journey, providing invaluable insights from an experienced creator. This article serves to further elaborate on these crucial tools, offering expanded context and expert tips to ensure a solid foundation for your emerging business.
Beyond the Basics: Prioritizing Safety in Your Nail Business
In any professional nail setting, safety is paramount, a truth emphasized in the video. The handling of uncured gel products, which contain monomers, necessitates protective measures to prevent skin contact. Such exposure, over time, can lead to sensitization and allergic reactions, a significant concern for those regularly working with these materials.
Nitrile gloves are considered an indispensable barrier in this regard. Unlike latex gloves, nitrile options typically offer superior chemical resistance and are less likely to cause allergic reactions. It is critical that these gloves are replaced frequently, especially if gel product makes contact with the surface. Furthermore, proper ventilation in the workspace is often overlooked but plays a crucial role in minimizing airborne chemical exposure, protecting both the technician and clients.
When tasks such as filing or buffing are performed, the generation of fine dust particles is unavoidable. These particles, derived from acrylic or gel, can pose respiratory risks if inhaled. Therefore, wearing a mask is not merely a suggestion but a vital safeguard. While basic dust masks can offer some protection, a higher-grade particulate respirator (e.g., N95) is often recommended for sustained exposure to fine dust, ensuring that plastic particles are kept out of the lungs.
The Foundation of Flawless Designs: Selecting Quality Nail Tips
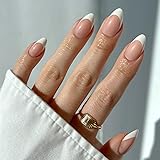
The very essence of a press-on nail set lies in its base: the full-cover nail tip. The video correctly points out the sheer variety of shapes and lengths available on the market. From classic square and elegant almond to dramatic coffin and sharp stiletto, the choices are extensive. For new businesses, an initial focus on 2-3 popular shapes is often advisable, particularly those frequently worn by the target demographic. This strategy minimizes initial inventory costs while allowing for market testing.
The speaker’s recommendation of A-pre nail tips highlights a crucial quality indicator: a thin cuticle edge combined with a thicker, more robust free edge. This design philosophy is paramount for achieving a natural aesthetic upon application and ensuring durability during wear. Inferior tips, often uniform in thickness, can appear bulky at the cuticle, creating an unnatural look. When sourcing nail tips, consideration should also be given to the material, with ABS plastic or soft gel tips being common. Soft gel tips, for instance, are known for their flexibility and ease of application, often allowing for a more seamless fit.
Achieving Stability and Precision: The Right Nail Stands
Precision in nail art is heavily reliant on stability, making the choice of nail stands a critical, yet often underestimated, decision. As noted in the video, not all nail stands are created equally. The preference for solid acrylic stands over hollow silver alternatives is rooted in practical application. The increased weight of solid acrylic provides a much-needed stable platform, significantly reducing the likelihood of accidental tipping during intricate painting or curing processes. This stability is particularly beneficial when working with delicate designs or when curing under a lamp, where jostling can lead to imperfections.
Beyond weight, the width of the stand’s surface also plays a significant role. Smaller nail sizes can present a challenge on narrower stands, often leading to gel polish bleeding onto the stand itself, necessitating tedious clean-up. Wider acrylic stands alleviate this issue, offering ample space for even the smallest tips. While many stands come with a tacky putty for adhesion, its reliability is often questioned. An alternative, as demonstrated in the video, involves using small pieces of nail tabs, which provide a significantly stronger and more consistent hold for the nail tips during the design phase. This small adjustment can save considerable time and frustration in the creative process.
Perfecting the Canvas: Files, Buffers, and Etching Techniques
The preparation of the nail tip before gel application is a fundamental step that greatly influences the final aesthetic and longevity of the press-on nail. Often, manufacturing processes leave small plastic remnants or rough edges on nail tips. These imperfections are meticulously removed using a quality nail file, ensuring a clean and uniform canvas. Files are also indispensable for minor shaping adjustments or refining the tip’s structure to match a specific client request.
Buffing, traditionally performed with a buffing block, serves to create a microscopically abrasive surface on the nail tip, enhancing the adhesion of subsequent gel layers. This mechanical etching increases the surface area, allowing for a stronger bond between the tip and the gel. More advanced technicians might employ chemical etching solutions, which achieve a similar effect without the need for physical abrasion. This method can be particularly effective for creating a matte base, ideal for chrome powders or certain art techniques, by optimizing the surface texture for maximum product adherence and a smooth finish.
The Unsung Heroes: Alcohol, Acetone, and Lint-Free Wipes
The clean and precise execution of gel nail art relies heavily on two unsung heroes: isopropyl alcohol and 100% acetone. The video rightly highlights that these two products can be used to create superior cleansers, often outperforming proprietary gel cleansers that frequently contain unnecessary additives or are diluted. Alcohol, particularly at concentrations of 80% or higher (with 99% being preferred for its purity and rapid evaporation), is crucial for wiping away the inhibition layer—the tacky, uncured residue left on gel after curing. It effectively cleanses the nail surface without leaving behind oils or residues that could compromise subsequent layers.
100% acetone, conversely, is a powerful solvent essential for several tasks. Its ability to penetrate and dissolve cured gel makes it invaluable for cleaning brushes, correcting mistakes, or thinning down thicker gels for intricate art. It must be noted that only pure acetone should be used for these purposes, as diluted versions or nail polish removers containing oils will leave residues that impede gel adhesion and curing. Complementing these liquids are lint-free wipes. The bane of any gel artist is lint or dust embedded in a fresh layer of gel. Lint-free wipes, especially when saturated with alcohol or acetone, ensure a perfectly clean surface, free from fibers that could ruin an otherwise flawless application.
Mastering Gel Application: A Deep Dive into Your Color Palette
The gel itself is arguably the heart of any press-on nail design, and thoughtful selection is key for a burgeoning business. The video suggests starting with two or three versatile nude gel tones, which cater to a broad clientele and offer a natural, sophisticated base. The preference for translucent nudes, as mentioned, often creates a more organic, natural nail appearance by allowing the natural nail bed to subtly show through, mimicking healthy, natural nails. However, opaque nudes also have their place, particularly for clients desiring full coverage or as a base for intricate designs.
For nail art, the initial investment in high-quality black and white art gels is highly strategic. These foundational colors allow for an immense range of designs, from classic French tips to intricate line work and detailed illustrations. Their versatility means that complex art can be achieved with minimal initial outlay. Expanding the color palette can then be approached systematically: rather than investing in a full spectrum of pre-mixed colors, starting with primary red, blue, and yellow gels, along with white and black, empowers the artist to mix an extensive range of secondary and tertiary colors. A basic understanding of color theory becomes a powerful tool, enabling the creation of custom shades and unique artistic expressions, with the exception of true neons which often require specialized pigments.
The final layer in the press-on process is the top coat, a critical component for durability, shine, and protection. Non-wipe top coats are a popular choice for their convenience, eliminating the tacky inhibition layer step. The selection of a top coat is highly personal and application-dependent, considering factors like viscosity (how thick or thin it is), finish (glossy or matte), and specific properties like flexibility, scratch resistance, or UV protection to prevent yellowing. Researching different brands and types, as encouraged, allows technicians to find a product that best suits their application style and client needs, ensuring a long-lasting and aesthetically pleasing finish.
The Power of Curing: Choosing an Effective Nail Lamp
The nail lamp is arguably the most critical piece of equipment in a gel nail business, as it is responsible for the polymerization—or curing—of gel products. An ineffective or improperly used lamp can lead to under-cured nails, which not only compromise durability but can also heighten the risk of gel allergies due due to prolonged contact with uncured monomers. The video appropriately recommends consulting resources like The Nail Hub for in-depth guidance on selecting a suitable lamp, underscoring the complexity of this purchase.
Key considerations when choosing a lamp include its wattage, the type of light emitted (UV, LED, or a combination), and the strategic placement of LEDs to ensure even curing. Modern lamps often utilize dual-light technology, combining UV and LED wavelengths to cure a wider range of gel formulations. A higher wattage typically translates to faster and more efficient curing. Additionally, features such as automatic sensors, varied timer settings, and a comfortable design for hands (or nail stands) are all factors that contribute to the overall efficiency and safety of the curing process. Regular maintenance, including cleaning and occasional bulb replacement (for certain UV lamps), is also important to maintain optimal curing performance.
Secure Adhesion: Ensuring Longevity and Client Satisfaction
Once crafted, the final step for any press-on nail business involves ensuring the completed nails can be securely adhered to the wearer’s natural nails. The two primary, and safest, methods for temporary adhesion are nail glue and adhesive nail tabs. Nail glue, as highlighted in the video with a specific brand recommendation, offers superior longevity, with proper application potentially keeping nails in place for two weeks or even longer. Its strong bond makes it ideal for clients seeking a durable, semi-permanent wear.
However, adhesive nail tabs cater to a different client need: short-term wear. These tabs are perfect for those who desire to wear press-ons for a specific event, a day or two, or for individuals who prefer to frequently change their nail designs without the commitment of glue. While the speaker notes their personal preference for glue on nails, the innovative use of nail tabs in place of putty for securing nails to stands during the design process is a clever tip. This method ensures a far more reliable hold for intricate work, demonstrating the versatility of these seemingly simple products in a press-on nail artist’s toolkit.
The Final Touch: Smart Packaging for Your Press-On Nails
The presentation of press-on nails, whether for sale or as a gift, significantly impacts the client’s perception of quality and professionalism. Simply handing over loose nails, as the video humorously implies, is hardly an option. The most practical and cost-effective packaging method involves mounting the nails on a backing card using double-sided tape. The speaker’s preference for pre-cut double-sided tape over rolls emphasizes uniformity and ease of use, streamlining the packaging process.
An ingenious use for leftover tacky putty—from nail stands, for example—is as a tool to meticulously place nails onto the tape, preventing fingerprints and ensuring precise alignment. This thoughtful detail contributes to a polished final product. The video wisely advises against overthinking branding and elaborate packaging in the early stages of a press-on nail business. The core focus should always remain on the quality of the nails themselves. Simple backing cards, even Q cards, are perfectly acceptable initially, allowing businesses to evolve their branding as they grow. The emphasis on high-quality press-on nails will inevitably build client trust and loyalty, which are far more valuable than immediate packaging perfection.